Before we get started, it should be mentioned that the Steam version of the game is required. If you want to create your own texture pack for Terraria you need the original files. If you look under the Spirits folder you will notice the “XNB” files. These XNB files are the sprites we want to modify, but simply opening them in an image editor will not work. We need to convert them into something that our PC can recognize.
To do this we first need the path to the files. This is usually different. Only at “steamapps” the path is the same:
\steamapps\common\Terraria\Content\Images
With the tool TConvert this is easily possible. You can download the tool here:
Virus? Don’t worry if your anti-virus program works. TConvert is not a virus, some antivirus programs simply warn you about unsigned .EXE files. Just click “Run anyway”.
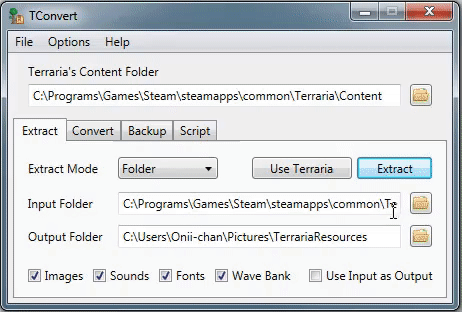
If the correct folder is specified in the “Input” Folder field, you should simply press Extract. After some time the files will be output to the specified Output Folder. Now it is time to start the correct editing. First of all you need a program to open and edit PNG files. This can be e.g. GIMP (Free). Unfortunately Microsoft Paint replaces the transparent pixels with white ones, then Terraria is full of white squares. If you use Windows, you don’t need to download any additional software.
Now you just have to find out which file you want to edit. The best way is to search the Terraria Wiki and look in the info box: At the bottom is the “Internal Item ID”. Just search in the folder you just extracted and you will find the right file. Here I would recommend to copy this file into another folder, maybe on your desktop. That makes it easier to find it later.
Now we just have to make the desired changes. New coloring, new sprite, whatever – do whatever you want! For this example I’ll stick with a simple recoloring. When you are done with the appropriate modifications, simply export your new sprite as PNG. Then you don’t have to do any fancy file conversions like we did before. Also make sure that the image has the same file name as when you extracted it! This is very important because the file name allows Terraria to identify the updated texture.
Animations:
Terraria has a simple method of handling animations, and you can probably already tell what it is. Each frame of the animation is on the same image, and they’re laid out in a vertical strip. The game handles animation on its own by cycling through the frames, but you must individually change each frame for it to look right.
I would recommend creating a temporary layer in GIMP (or in another program of your choice) and outlining each frame to create a border, as crossing this border could cause the frames to be cut off and incorrect frame orientation will make the animation look less smooth. You should also avoid changing the resolution of the image; I’m not sure what will happen if you try, but I honestly doubt that the result will be beautiful.
Quick tip: If you’re changing an animated sprite (like the Fallen Star), but don’t want it to have an animation, simply make each frame of the animation the exact same image! You can see this exact process being used for shorter hairstyles, like the default one.
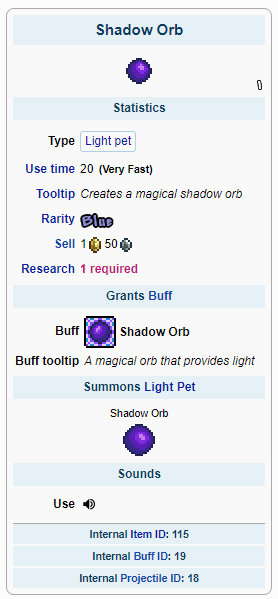
The other thing I want to mention is that certain items have multiple sprites associated with them, and I’m not talking about animations. How about another example? Let’s take a look at the first Light Pet, the Shadow Orb.
There’s an Item ID, sure, but there’s also a Buff ID and a Projectile ID! What gives?
In this particular example, Item ID refers to the item known as the Shadow Orb, which you get by… smashing Shadow Orbs. The Buff ID is the Buff applied to the player, causing the Orb to follow them – you can actually see this in the image above. Finally, the Projectile ID is the Orb that follows the player around.
To summarize: Item grants Buff, Buff causes Projectile to follow player.
Creation: Setting Up a Pack
Now we just have to turn the new textures into a texture pack for Terraria! First we have to navigate to our resource pack folder. That’s easy enough, because the game does that for us – just click on “Texture Packs” in the main menu, and a big button labeled “Open Folder” will appear at the bottom of the screen.
Now that you are in the correct folder, create a new folder. Give it a name of your choice. Then you will want something in that folder that looks like this:
Let’s go through this step by step. icon.png is the only optional thing here. This is the thumbnail that your texture package uses. This fancy frame is added automatically, by the way. Finally, the subfolder “Content” follows. Inside this folder is another folder called Images, and in this folder you will find our resprites!
pack.json is the file that allows your package to be recognized in the game. To create it, simply copy a .json file from another folder – there are some in Documents / My Games / Terrariums – and paste it into this folder, then rename the file to pack.json and open it in Notepad. Replace the whole text with the following text:
{
    "Name": "Pack Name",
    "Author": "Author",
    "Description": "Place a one-line brief description of your pack here",
    "Version": {
        "major": 1,
        "minor": 0
    }
}
Replace “pack name”, “author” and “short description” with the corresponding text. Make sure that the quotation marks are preserved. Then you have to pack the pack as ZIP. To do this, right click on the folder, on “Send” and Zip folder. Here you can download a small Demo Pack:


")
")
")

 Cazum8 Golem Boss")


")
")
")
 Cazum8 Golem Boss")
